win32模块是用来向用户提供一系列操作Windows控件的SDK,让用户通过简单的参数和方法调用来实现一些复杂的操作。要使用win32模块,需要使用rpa.ui.win32进行操作。在学习此课程前请点击下方链接,熟悉API文档,SDK的具
win32模块是用来向用户提供一系列操作Windows控件的SDK,让用户通过简单的参数和方法调用来实现一些复杂的操作。要使用win32模块,需要使用rpa.ui.win32进行操作。在学习此课程前请点击下方链接,熟悉API文档,SDK的具体功能作用在此不再赘述,传送门:教程内容:本教程包含两节内容,分别为窗口操作、应用控件操作。
目录
案例介绍
以IE浏览器为例,创建浏览器窗口,执行窗口相关的一系列操作。
案例实现
新建应用
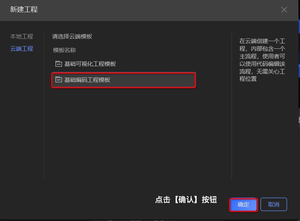
1.登录studio,选择新建云端工程 -> 选择 基础编码工程模版 -> 点击【确定】,进入开发主界面。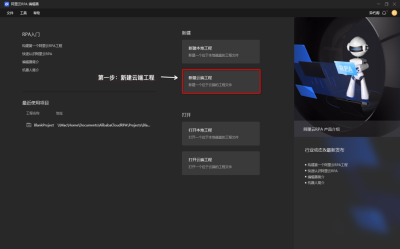

代码编写
本段代码提供了一个简单的浏览器操作代码示例,按照示例进行代码敲写,示例代码的注释(带有“#”的行数为注释行)中详细解释了语句及SDK的作用,带有print语句的操作执行的结果在日志中查看,操作所包含win32的sdk有:win_activate、win_close、catch、win_minimize、win_maximize、win_exists
from rpa.core import * from rpa.utils import * import rpa4 as rpa # 使用V3引擎 import win32 def start(): # Window窗口操作 window_operation() def window_operation(): urls=['www.taobao.com','www.baidu.com','www.aliyun.com'] for url in urls: #依次创建 “淘宝”,“百度”,“阿里云”网页 rpa.app.ie.create(url) sleep(1) # # 依次激活各个网页 rpa.ui.win32.win_activate('淘宝网') sleep(1) rpa.ui.win32.win_activate('百度') sleep(1) rpa.ui.win32.win_activate('阿里云') # 关闭打开的页面 rpa.ui.win32.win_close('阿里云') sleep(1) rpa.ui.win32.win_close('百度') sleep(1) rpa.ui.win32.catch('淘宝网',mode='start') #捕获根据标题淘宝页面,mode默认为start可不填 #最小化窗口 rpa.ui.win32.win_minimize('淘宝网') sleep(1) #最大化窗口 rpa.ui.win32.win_maximize('淘宝网') sleep(1) #判断窗口是否存在,日志中输出如果为True则窗口存在 exist = rpa.ui.win32.win_exists('淘宝网') print("淘宝网窗口是否存在:{}".format(exist)) rpa.app.ie.close_all()调试预览
打开上方调试预览,点击开始按钮运行程序,运行效果如下列连接视频所示。
win32窗口操作
案例介绍二
本小节内容提供了一个win32场景汇总的测试应用,该应用内前面教学案例中已有的SDK在此不做演示,希望同学们课下寻找对应场景练习熟悉win32的SDK,,测试工具请点击连接下载:winform
案例实现二
新建应用
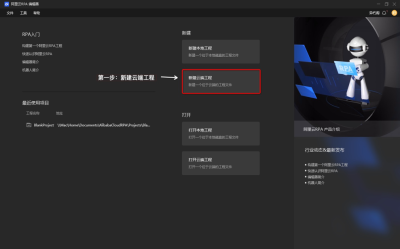
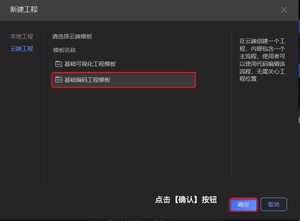
点击【新建编码模式工程】,选择【机器人类型】,再点击【确认新建】

**
代码编写
from rpa.core import * from rpa.core import * from rpa.utils import * import rpa4 as rpa import os def start(): win32_get_select_items_comboBox() win32_set_get_datetimepicker_time() win32_wincheck_chkbox_wfm() win32_screeenshot() win32_mouse_move() def win32_get_select_items_comboBox(): ''' 获取下拉框的值 ''' try: wnd = rpa.ui.win32.catch('WinForm') items = wnd.get_selected_items('comboBox',mode='all', index = 1) if items == ['1234','12345']: print('comboBox的item获取成功,获取到的数组为:'+str(items)) else: print('comboBox的item获取失败') except Exception as e: print('Exception:e ->' + str(e)) def win32_set_get_datetimepicker_time(): ''' WIn32模块中设置/获取日期控件的时间 ''' try: rpa.ui.win32.elem_set_datetimepicker("time",year=,month=11,day=11,hour=11,minute=30,second=30)#1.给日期控件进行日期赋值 sleep(3) time = rpa.win32.get_datetimepicker(element="Time")#2.设置时间之后获取该控件日期 result=(time == [,8,8,8,30,30]) print('校验日期控件的赋值和取值:'+'设置了[,8,5,8,30,30]'+'取到的值为:'+str(result)) except Exception as e: print('Exception:e ->' + str(e)) def win32_wincheck_chkbox_wfm(): """ 在winform中,checkbox 勾选、取消勾选校验 """ try: wnd = rpa.ui.win32.catch('WinForm') # 勾选 rpa.ui.win32.elem_set_checked_state("cb_Name",value=True) sleep(2) value = rpa.ui.win32.elem_get_checked_state("cb_Name") print('cb_name 勾选操作是否成功:'+str(value)) # 取消勾选 rpa.ui.win32.elem_set_checked_state("cb_Name",value=False) sleep(2) value = rpa.ui.win32.elem_get_checked_state("cb_Name") print('cb_name 取消勾选操作是否成功:'+str(value)) # set_check勾选 wnd.set_checked_state(element='cb_Sex',value=True) sleep(2) value = rpa.ui.win32.elem_get_checked_state("cb_Sex") print('cb_sex 勾选操作是否成功:'+str(value)) #获取元素勾选,勾选为True,未勾选为False state = wnd.get_checked_state('cb_Sex') print(state) # 取消勾选 wnd.set_checked_state(element='cb_Sex',value=False) sleep(2) value = rpa.ui.win32.elem_get_checked_state("cb_Sex") print('cb_sex 取消勾选操作是否成功:'+str(not value)) state = wnd.get_checked_state('cb_Sex') print('cb_name 勾选:状态为:'+str(state)) except Exception as e: print('Exception e:'+str(e)) def win32_screeenshot(): ''' win32中控件截图操作 ''' cnd = rpa.ui.win32.catch('WinForm') cnd.screenshot('日历',file=r'\\Mac\Home\Desktop\日历控件截图.jpg') def win32_mouse_move(): cnd = rpa.ui.win32.catch('WinForm') cnd.mouse_move(element='comboBox') text = cnd.text('mouse_move') if text == '移入comboBox': print("win32鼠标移入操作结果:True") cnd.close()控件录制
第一步:打开winform应用
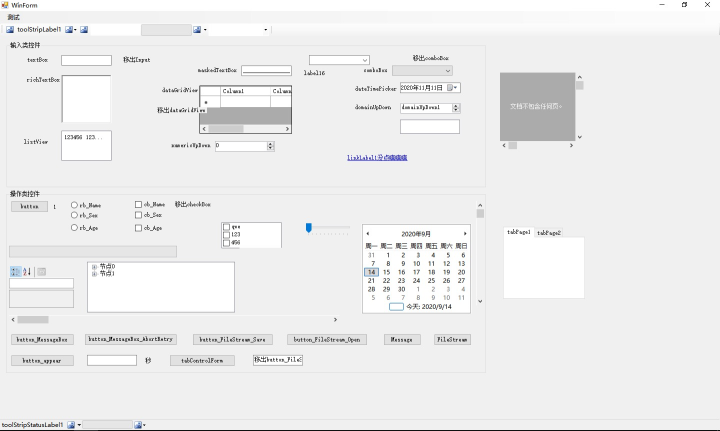
第二步:录制控件录制元素的操作如视频所示:winform控件录制
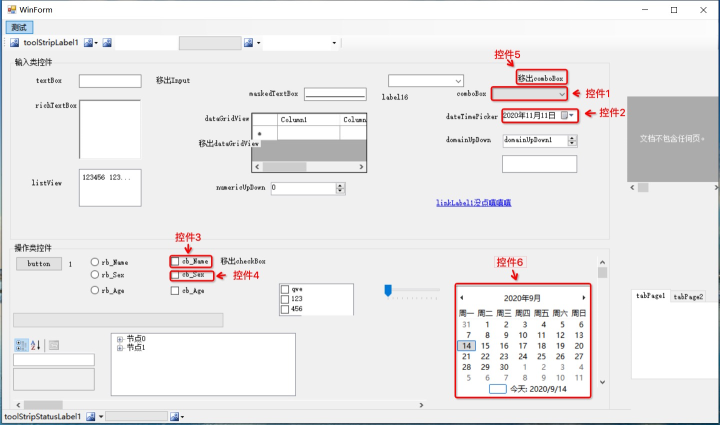
调试运行
点击studio工具栏内调试运行选项,程序运行效果如视频所示:winform
发表回复